
기록방
11장 : HTTP와 REST 컨트롤러 본문
길벗 IT도서에서 주관하는 코딩 자율학습단 8기 : Spring Boot 파트에 참여한 기록입니다 [ 목록 ]
11.1 REST API의 동작 이해하기
- REST : HTTP URL로 서버의 자원(resource)을 명시하고, HTTP 메서드(POST, GET, PATCH/PUT, DELETE)로 해당 자원에 대해 CRUD(생성, 조회, 수정, 삭제)하는 것
- API : 클라이언트가 서버의 자원을 요청할 수 있도록 서버에서 제공하는 인터페이스(interface)
- REST API
- REST 기반으로 API를 구현한 것
- 클라이언트가 기기에 구애 받지 않고 서버의 자원을 이용할 수 있음
- 서버가 클라이언트의 요청에 체계적으로 대응할 수 있어서 서버 프로그램의 재사용성과 확장성이 좋아짐
11.2 REST API의 구현 과정
- REST API 주소 설계
- 조회 요청 :
/api/articles또는/api/articles/{id}- GET 메서드로 Article 목록 전체 또는 단일 Article을 조회
- 생성 요청 :
/api/articles- POST 메서드로 새로운 Article을 생성해 목록에 저장
- 수정 요청 :
/api/articles/{id}- PATCH 메서드로 특정 Article의 내용을 수정
- 삭제 요청 :
/api/articles/{id}- DELETE 메서드로 특정 Article을 삭제
- 조회 요청 :
- 일반적인 컨트롤러 대신 REST 컨트롤러 사용
- 응답할 때 적절한 상태 코드를 반환하기 위해 ResponseEntity 클래스 활용
11.3 REST API 구현하기
- api 패키지 생성
- com.exaple.firstproject.api
11.3.1 REST 컨트롤러 맛보기
package com.example.firstproject.api;
import org.springframework.web.bind.annotation.GetMapping;
import org.springframework.web.bind.annotation.RestController;
@RestController
public class FirstApiController {
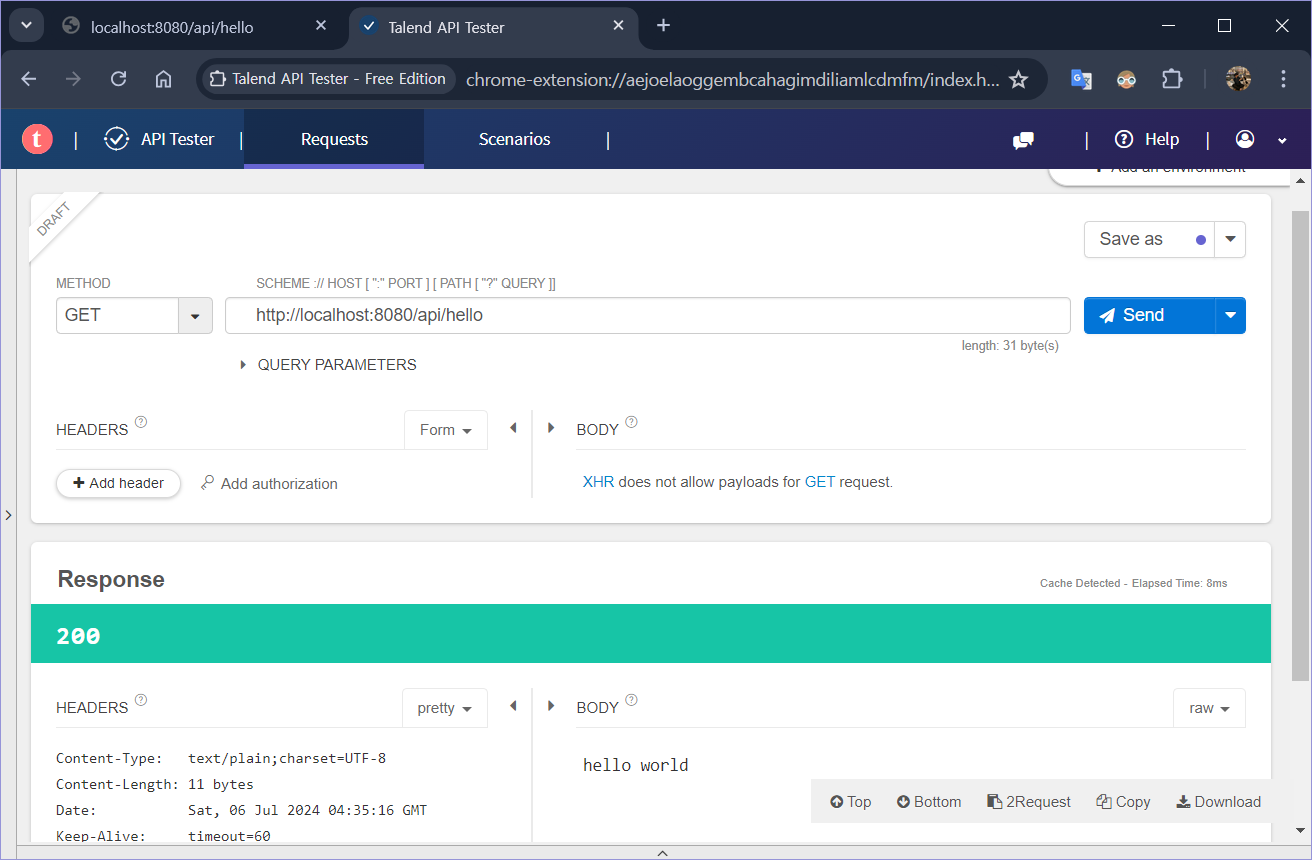
@GetMapping("/api/hello")
public String hello() {
return "hello world";
}
}- 새 패키지에
@RestController만들기

Rest 컨트롤러와 일반 컨트롤러의 차이
- 일반 컨트롤러 : 뷰 페이지(HTML) 반환
- REST 컨트롤러 : JSON이나 텍스트 같은 데이터를 반환
11.3.2 REST API : GET 구현하기
모든 게시글 조회하기
package com.example.firstproject.api;

import com.example.firstproject.entity.Article;
import com.example.firstproject.repository.ArticleRepository;
import org.springframework.beans.factory.annotation.Autowired;
import org.springframework.web.bind.annotation.GetMapping;
import org.springframework.web.bind.annotation.RestController;

import java.util.List;

@RestController
public class ArticleApiController {
    @Autowired
    private ArticleRepository articleRepository;
    // GET
    @GetMapping("/api/articles")
    public List<Article> index() {
        return articleRepository.findAll();
    }
    // POST

    // PATCH

    // DELETE

}- Article의 REST 컨트롤러 생성 후 GET 메서드 구현


단일 게시글 조회하기
@GetMapping("/api/articles/{id}")
public Article show(@PathVariable Long id) {
    return articleRepository.findById(id).orElse(null);
}
11.3.3 REST API : POST 구현하기
게시글 생성하기
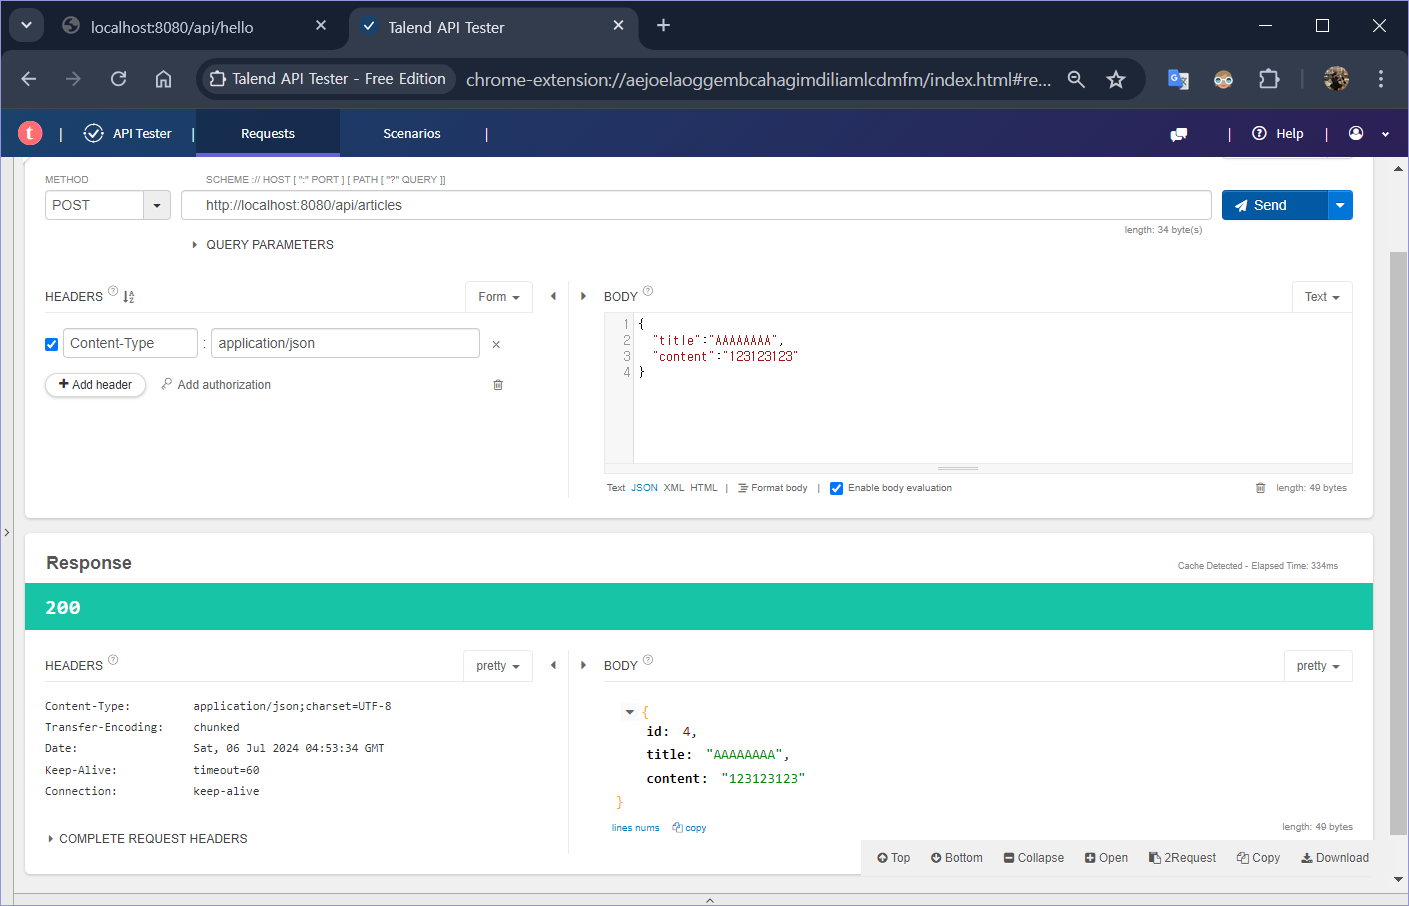
// POST
@PostMapping("/api/articles")
public Article create(@RequestBody ArticleForm dto) {
    Article article = dto.toEntity();
    return articleRepository.save(article);
}- REST 컨트롤러에서는 단순 DTO로 매개변수를 받는 것이 아니라, JSON 데이터를 받아서 처리해야 하므로
@RequestBody를 사용해야 한다.

11.3.4 REST API : PATCH 구현하기
데이터 전체를 수정할 경우
// PATCH
@PatchMapping("/api/articles/{id}")
public ResponseEntity<Article> update(@PathVariable Long id, @RequestBody ArticleForm dto) {
// 1. DTO -> 엔티티 변환하기
Article article = dto.toEntity();
log.info("id: {}, article: {}", id, article);
// 2. 타깃 조회하기
Article target = articleRepository.findById(id).orElse(null);
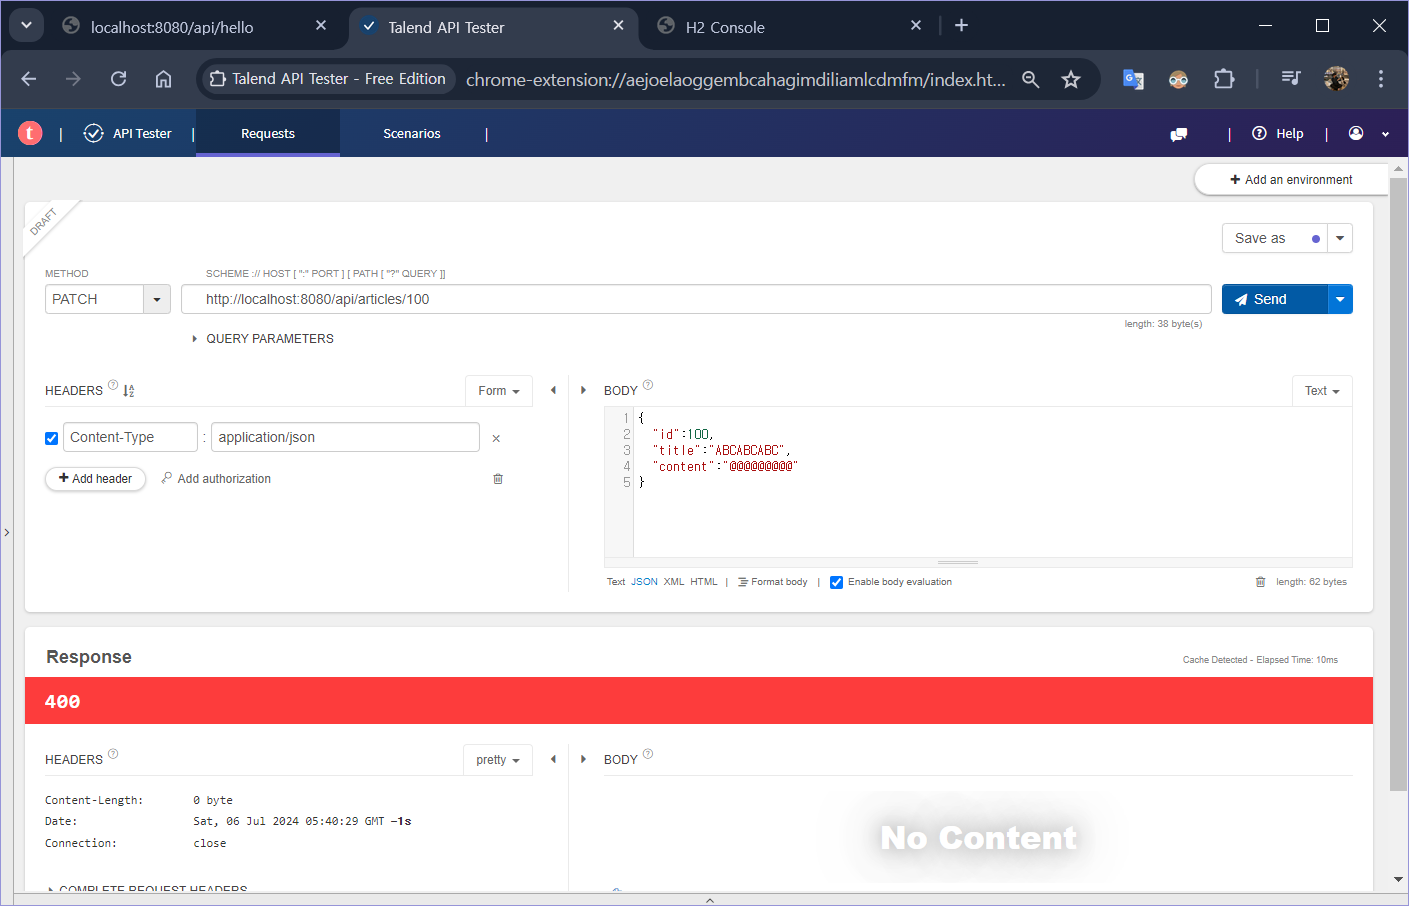
// 3. 잘못된 요청 처리하기
if (target == null || id != target.getId()) {
// 400, 잘못된 요청 응답!
log.info("잘못된 요청! id: {}, article: {}", id, article);
return ResponseEntity.status(HttpStatus.BAD_REQUEST).body(null);
}
// 4. 업데이트 및 정상 응답(200)하기
Article updated = articleRepository.save(article);
return ResponseEntity.status(HttpStatus.OK).body(updated);
}

💡 ResponseEntity와 HttpStatus
- ResponseEntity는 REST 컨트롤러의 반환형, 즉 REST API의 응답을 위해 사용하는 클래스. REST API 요청을 받아 응답할 때 이 클래스에 HTTP 상태 코드, 헤더, 본문을 실어 보낼 수 있음.
- HttpStatus는 HTTP 상태 코드를 관리하는 클래스로, 다양한 Enum 타입과 관련한 메서드를 가짐.
- Enum 타입은 열거형으로, 여러 상수로 이루어진 고정 집합을 가짐. 열거형이름.상수
ex) 200 : HttpStatus.OK , 201 : HttpStatus.CREATED , 400 : HttpStatus.BAD_REQUEST
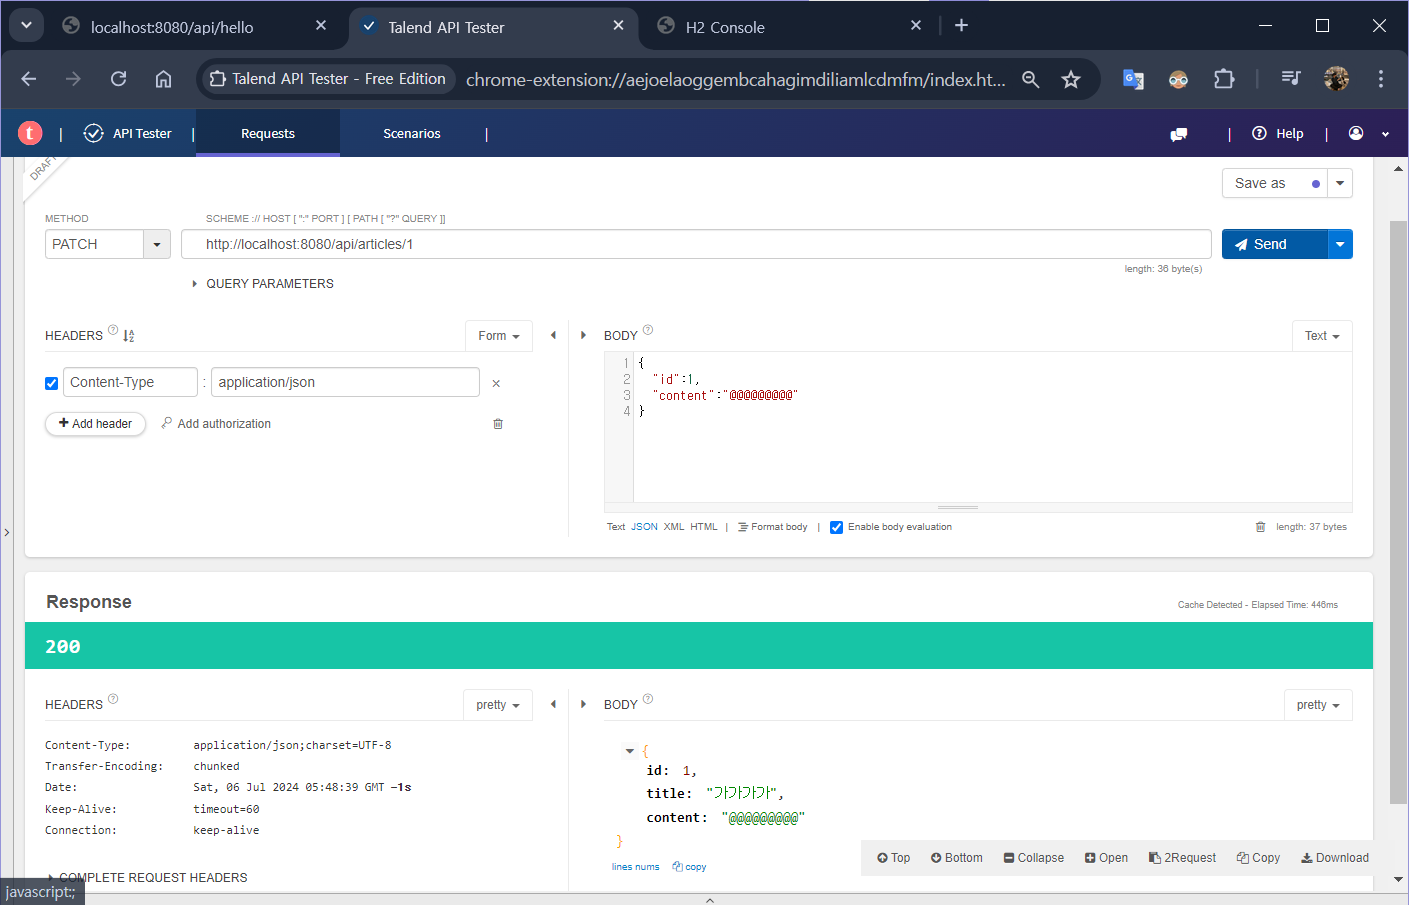
일부 데이터만 수정할 경우

    // 4. 업데이트 및 정상 응답(200)하기
    **target.patch(article);**
    Article updated = articleRepository.save(**target**);
    return ResponseEntity.status(HttpStatus.OK).body(updated);
}- DB에서 꺼내온 target에 수정 할 데이터인 article을 넣는 방식으로 변경
public class Article {
    @Id // 엔티티의 대푯값 지정
//    @GeneratedValue // 자동 생성 기능 추가(숫자가 자동으로 매겨짐)
    @GeneratedValue(strategy = GenerationType.IDENTITY) // DB가 id 자동 생성
    private Long id;
    @Column // title 필드 선언. DB 테이블의 title 열과 연결
    private String title;
    @Column // content 필드 선언. DB 테이블의 content 열과 연결
    private String content;

    **public void patch(Article article) {
        if(article.title != null) {
            this.title = article.title;
        }
        if(article.content != null) {
            this.content = article.content;
        }
    }**
}- Article 엔티티에 patch 메서드 추가
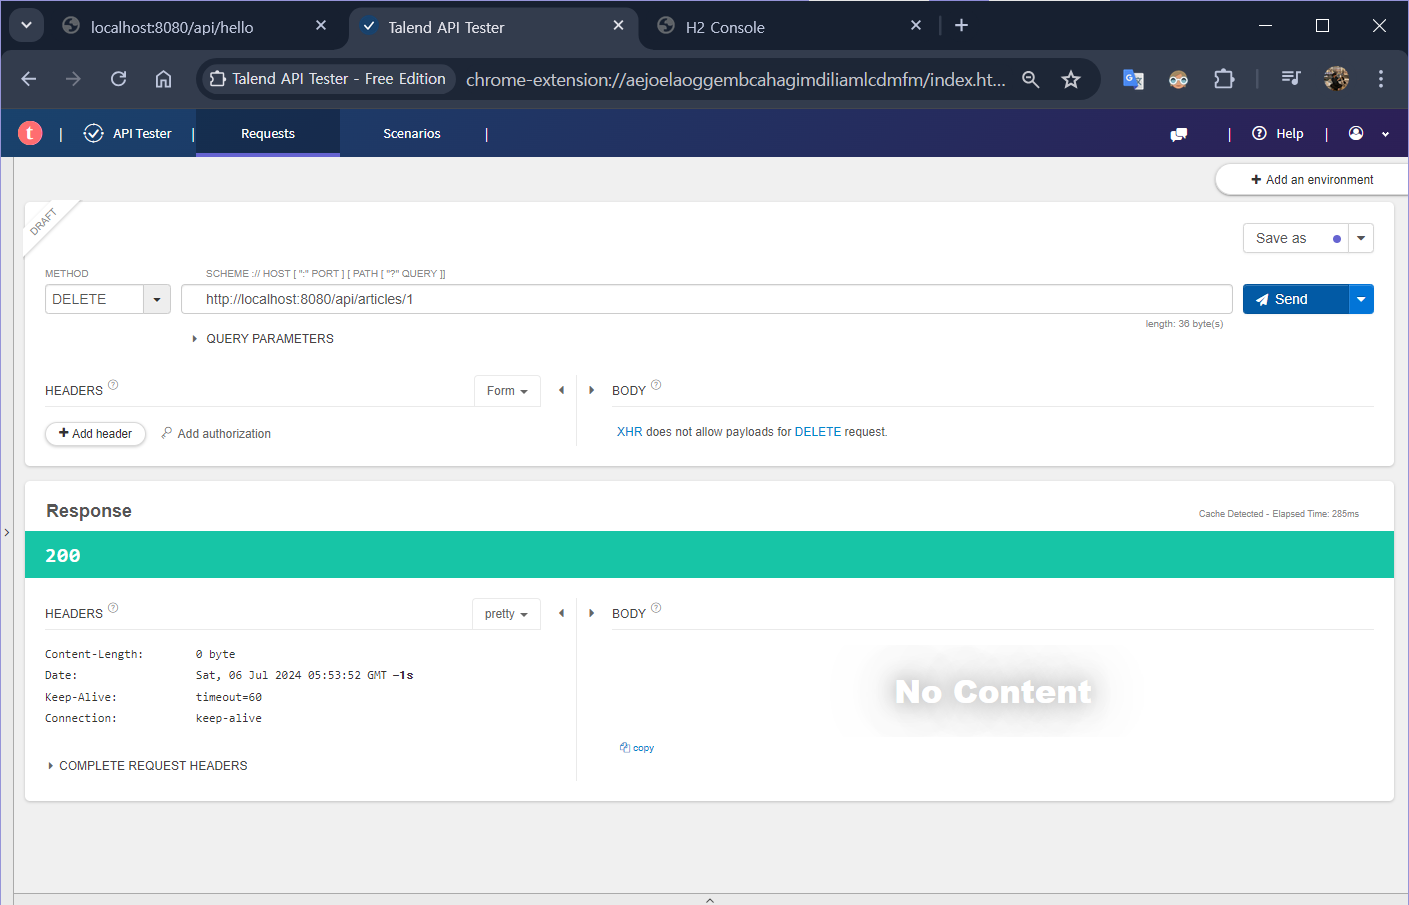
11.3.5 REST API : DELETE 구현하기
// DELETE
@DeleteMapping("/api/articles/{id}")
public ResponseEntity<Article> create(@PathVariable Long id) {
    // 1. 대상 찾기
    Article target = articleRepository.findById(id).orElse(null);

    // 2. 잘못된 요청 처리하기
    if (target == null) {
        return ResponseEntity.status(HttpStatus.BAD_REQUEST).body(null);
    }

    // 3. 대상 삭제하기
    articleRepository.delete(target);
//  return ResponseEntity.status(HttpStatus.OK).body(null);
    return ResponseEntity.status(HttpStatus.OK).build();
}ResponseEntity의build()메서드는body(null)과 같음

🚀 1분 퀴즈
빈칸에 들어갈 용어를 찾아 쓰세요.
- (
@RestController) : REST API 구현을 위한 컨트롤러에 사용하는 애노테이션 - (
@PatchMapping) : HTTP 요청 중 PATCH 메서드를 처리하는 애노테이션 - (
@DeleteMapping) : HTTP 요청 중 DELETE 메서드를 처리하는 애노테이션 - (
ResponseEntity) : REST API 요청을 받아 응답할 때 HTTP 상태 코드, 헤더, 본문을 실어 보내는 클래스 - (
HttpStatus) : HTTP 상태 코드를 관리하는 클래스
✅ 셀프 체크
package com.example.firstproject.api;
import com.example.firstproject.dto.CoffeeDto;
import com.example.firstproject.entity.Coffee;
import com.example.firstproject.repository.CoffeeRepository;
import lombok.extern.slf4j.Slf4j;
import org.springframework.beans.factory.annotation.Autowired;
import org.springframework.http.HttpStatus;
import org.springframework.http.ResponseEntity;
import org.springframework.web.bind.annotation.*;
import java.util.List;
@RestController
@Slf4j
public class CoffeeApiController {
@Autowired
private CoffeeRepository coffeeRepository;
// GET
@GetMapping("/api/coffees")
public List<Coffee> index() {
return coffeeRepository.findAll();
}
@GetMapping("/api/coffees/{id}")
public Coffee show(@PathVariable Long id) {
return coffeeRepository.findById(id).orElse(null);
}
// POST
@PostMapping("/api/coffees")
public Coffee create(@RequestBody CoffeeDto dto) {
Coffee coffee = dto.toEntity();
return coffeeRepository.save(coffee);
}
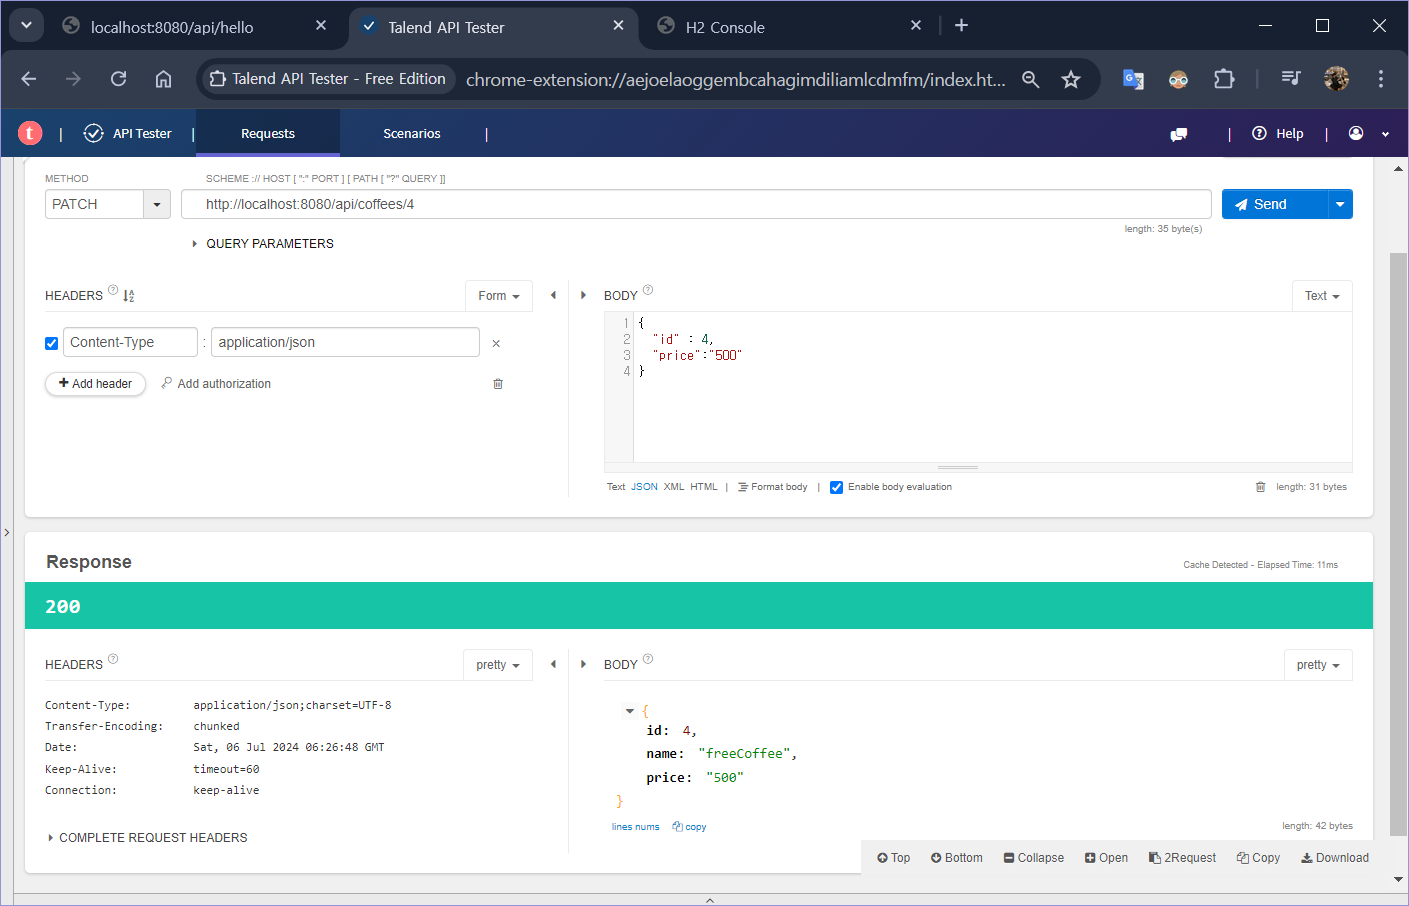
// PATCH
@PatchMapping("/api/coffees/{id}")
public ResponseEntity<Coffee> update(@PathVariable Long id, @RequestBody CoffeeDto dto) {
// 1. DTO -> 엔티티 변환하기
Coffee coffee = dto.toEntity();
log.info("id: {}, Coffee: {}", id, coffee);
// 2. 타깃 조회하기
Coffee target = coffeeRepository.findById(id).orElse(null);
// 3. 잘못된 요청 처리하기
if (target == null || id != coffee.getId()) {
// 400, 잘못된 요청 응답!
log.info("잘못된 요청! id: {}, coffee: {}", id, coffee);
return ResponseEntity.status(HttpStatus.BAD_REQUEST).body(null);
}
// 4. 업데이트 및 정상 응답(200)하기
target.patch(coffee);
Coffee updated = coffeeRepository.save(target);
return ResponseEntity.status(HttpStatus.OK).body(updated);
}
// DELETE
@DeleteMapping("/api/coffees/{id}")
public ResponseEntity<Coffee> create(@PathVariable Long id) {
// 1. 대상 찾기
Coffee target = coffeeRepository.findById(id).orElse(null);
// 2. 잘못된 요청 처리하기
if (target == null) {
return ResponseEntity.status(HttpStatus.BAD_REQUEST).body(null);
}
// 3. 대상 삭제하기
coffeeRepository.delete(target);
// return ResponseEntity.status(HttpStatus.OK).body(null);
return ResponseEntity.status(HttpStatus.OK).build();
}
}- CoffeeApiController
package com.example.firstproject.dto;

import com.example.firstproject.entity.Article;
import com.example.firstproject.entity.Coffee;
import lombok.AllArgsConstructor;
import lombok.ToString;

@AllArgsConstructor
@ToString
public class CoffeeDto {
    private Long id;
    private String name; // 제목을 받을 필드
    private String price; // 내용을 받을 필드

    public Coffee toEntity() {
        return new Coffee(id, name, price);
    }
}- CoffeeDto
package com.example.firstproject.entity;

import jakarta.persistence.*;
import lombok.AllArgsConstructor;
import lombok.Getter;
import lombok.NoArgsConstructor;
import lombok.ToString;

@Entity
@AllArgsConstructor
@NoArgsConstructor
@ToString
@Getter
public class Coffee {
    @Id
    @GeneratedValue(strategy = GenerationType.IDENTITY)
    private Long id;
    @Column
    private String name;
    @Column
    private String price;

    public void patch(Coffee coffee) {
        if (coffee.name != null)
            this.name = coffee.name;
        if(coffee.price != null)
            this.price = coffee.price;
    }
}
- Coffee Entity
package com.example.firstproject.repository;

import com.example.firstproject.entity.Article;
import com.example.firstproject.entity.Coffee;
import org.springframework.data.repository.CrudRepository;
import org.springframework.stereotype.Repository;

import java.util.ArrayList;

@Repository
public interface CoffeeRepository extends CrudRepository<Coffee, Long> {
    @Override
    ArrayList<Coffee> findAll(); // Iterable -> ArrayList 수정
}- CoffeeRepository


🏓 더 알아볼 내용
1. @RestController
10장에서는 REST에 대해서 배웠고, 11장에서는 REST API에 대해서 배웠습니다.
이전까지는 @RestController가 아닌 @Controller 어노테이션을 붙여서 사용했는데요.
둘은 어떤 차이가 있을까요?
우선 @Controller의 내부 코드를 살펴봅시다.
/**
    * Indicates that an annotated class is a "Controller" (e.g. a web controller).
    *
    * <p>This annotation serves as a specialization of {@link Component @Component},
    * allowing for implementation classes to be autodetected through classpath scanning.
    * It is typically used in combination with annotated handler methods based on the
    * {@link org.springframework.web.bind.annotation.RequestMapping} annotation.
    *
    * @author Arjen Poutsma
    * @author Juergen Hoeller
    * @since 2.5
    * @see Component
    * @see org.springframework.web.bind.annotation.RequestMapping
    * @see org.springframework.context.annotation.ClassPathBeanDefinitionScanner
*/
@Target(ElementType.TYPE)
@Retention(RetentionPolicy.RUNTIME)
@Documented
@Component
public @interface Controller {
    /**
        * The value may indicate a suggestion for a logical component name,
        * to be turned into a Spring bean in case of an autodetected component.
        * @return the suggested component name, if any (or empty String otherwise)
    */
    @AliasFor(annotation = Component.class)
    String value() default "";
}*
@Controller는 classpath scanning을 통해 자동 감지를 위해 사용된다고 적혀 있습니다.
그렇다면 @RestController는 어떨까요? 내부 코드를 보시죠.
/**
    * A convenience annotation that is itself annotated with
    * {@link Controller @Controller} and {@link ResponseBody @ResponseBody}.
    * <p>
    * Types that carry this annotation are treated as controllers where
    * {@link RequestMapping @RequestMapping} methods assume
    * {@link ResponseBody @ResponseBody} semantics by default.
    *
    * <p><b>NOTE:</b> {@code @RestController} is processed if an appropriate
    * {@code HandlerMapping}-{@code HandlerAdapter} pair is configured such as the
    * {@code RequestMappingHandlerMapping}-{@code RequestMappingHandlerAdapter}
    * pair which are the default in the MVC Java config and the MVC namespace.
    *
    * @author Rossen Stoyanchev
    * @author Sam Brannen
    * @since 4.0
*/
@Target(ElementType.TYPE)
@Retention(RetentionPolicy.RUNTIME)
@Documented
@Controller
@ResponseBody
public @interface RestController {
    /*
        * The value may indicate a suggestion for a logical component name,
        * to be turned into a Spring bean in case of an autodetected component.
        * @return the suggested component name, if any (or empty String otherwise)
        * @since 4.0.1
    */
    @AliasFor(annotation = Controller.class)
    String value() default "";
}
@RestController를 가장 정확하게 표현하는 문장이 맨 첫 줄에 있습니다.
A convenience annotation that is itself annotated with @Controller and @RequestBody
@RestController는 @Controller와 @ResponseBody를 합쳐 사용하는 것과 완전히 동일한 것입니다.
그렇다면 @ResponseBody는 왜 필요할까요?
그 이유는 @ResponseBody를 사용해야 객체를 JSON 타입으로 변환해서 내려줄 수 있기 때문입니다.
2. @RequestBody
앞에서 간단하게 @ResponseBody를 살펴봤습니다.
@RequestBody는 역으로 요청을 받는 애노테이션 입니다.
다음 예제 코드를 보겠습니다.
@RequestMapping("/")
@RestController
@RequiredArgsConstructor
public class Test {
    private final TaskRepository taskRepository;
    @PostMapping
    public Task create(@RequestBody TaskCreateRequest request) {
        Task task = new Task(request.getName());
        taskRepository.save(task);
        return task;
    }
}
TaskCreateRequest라는 DTO를 정의했고, @RequestBody 어노테이션을 사용해 요청을 받고 있습니다.
이처럼 @RequestBody는 데이터를 생성하는 POST 메서드와 데이터를 수정하는 PUT, PATCH 메서드에서만 가능합니다.
@RequestBody에 사용될 클래스는 반드시 기본 생성자가 필요합니다(안정적 사용을 위해 Getter까지). 이 점 꼭 유의해서 @RequestBody를 사용하길 바랍니다.
🥕 간단 정리
- @RequestBody ⇒ JSON → 객체 (직렬화)
- @ResponseBody ⇒ 객체 → JSON (역직렬화)
3. JSON
JSON은 JavaScript Object Notation의 줄임말로, 자바스크립트 객체 문법으로 구조화된 데이터를 표현하기 위한 문자 기반의 표준 포맷입니다.
이전에는 XML을 사용했지만 JSON이 등장하면서 모두 JSON으로 대체됐습니다.
자바에서 객체를 생성하려면 생성자를 통해 값을 초기화한 후 인스턴스를 만들어야 합니다.
하지만 자바스크립트에서는 간단하게 중괄호({})로 객체 생성을 할 수 있습니다.
{
        "name" : "john",
        "age" : 40,
        "job" : "software engineer"
}
위와 같이 작성하면 자바스크립트에서는 객체가 생성됩니다.
JSON은 깊은 댑스(depth)의 객체를 쉽게 표현할 수 있을 뿐만 아니라 배열도 간단하게 표현할 수 있습니다. 예를 들면 아래와 같이 말이죠.
{
        "squadName": "Super hero squad",
        "homeTown": "Metro City",
        "formed": 2016,
        "secretBase": "Super tower",
        "active": true, "members": [
            {
                "name": "Molecule Man",
                "age": 29,
                "secretIdentity": "Dan Jukes",
                "powers": ["Radiation resistance", "Turning tiny", "Radiation blast"]
            },
            {
                "name": "Madame Uppercut",
                "age": 39,
                "secretIdentity": "Jane Wilson",
                "powers": [ "Million tonne punch", "Damage resistance", "Superhuman reflexes" ]
            },
            {
                "name": "Eternal Flame",
                "age": 1000000,
                "secretIdentity": "Unknown",
                "powers": [ "Immortality", "Heat Immunity", "Inferno", "Teleportation", "Interdimensional travel" ]
            }
        ]
}
JSON에 대해 더 알아보고 싶다면 다음 문서를 참고해 주세요.
'FrameWork > Spring' 카테고리의 다른 글
| 13장 : 테스트 코드 작성하기 (0) | 2024.07.09 |
|---|---|
| 12장 : 서비스 계층과 트랜잭션 (0) | 2024.07.09 |
| 10장 : REST API와 JSON (0) | 2024.06.23 |
| 9장 : CRUD와 SQL 쿼리 종합 (0) | 2024.06.22 |
| 8장 : 게시글 삭제하기: Delet (0) | 2024.06.21 |


