기록방
15장 : 댓글 컨트롤러와 서비스 만들기 본문
길벗 IT도서에서 주관하는 코딩 자율학습단 8기 : Spring Boot 파트에 참여한 기록입니다 [ 목록 ]
15.1 댓글 REST API의 개요
- REST 컨트롤러
- 댓글 REST API를 위한 컨트롤러
- 서비스와 협업, 클라이언트 요청을 받아 응답하며 뷰(view)가 아닌 데이터 반환
- 서비스
- REST 컨트롤러와 리포지토리 사이에서 비지니스 로직, 즉 처리 흐름을 담당
- 예외 상황이 발생했을 때 @Transactional로 변경된 데이터 롤백
- DTO
- 사용자에게 보여 줄 댓글 정보를 담은 것
- 단순히 클라이언트와 서버 간에 댓글 JSON 데이터 전송
- 엔티티
- DB 데이터를 담는 자바 객체로 엔티티를 기반으로 테이블 생성
- 리포지토리가 DB 속 데이터를 조회하거나 전달할 때 사용
- 리포지토리
- 엔티티를 관리하는 인터페이스
- 데이터 CRUD 등의 기능 제공
- 서비스로부터 댓글 CRUD 등의 명령을 받아 DB에 보내고 응답받음
15.2 댓글 컨트롤러와 서비스 틀 만들기
package com.example.firstproject.api;

import com.example.firstproject.service.CommentService;
import org.springframework.beans.factory.annotation.Autowired;
import org.springframework.web.bind.annotation.RestController;

@RestController
public class CommentApiController {
    @Autowired
    private CommentService commentService;
    // 1. 댓글 조회
    // 2. 댓글 생성
    // 3. 댓글 수정
    // 4. 댓글 삭제
}
package com.example.firstproject.service;
import com.example.firstproject.repository.ArticleRepository;
import com.example.firstproject.repository.CommentRepository;
import org.springframework.beans.factory.annotation.Autowired;
import org.springframework.stereotype.Service;
@Service
public class CommentService {
@Autowired
private CommentRepository commentRepository;
@Autowired
private ArticleRepository articleRepository;
}15.3 댓글 조회하기
package com.example.firstproject.api;

import com.example.firstproject.dto.CommentDto;
import com.example.firstproject.entity.Comment;
import com.example.firstproject.service.CommentService;
import org.springframework.beans.factory.annotation.Autowired;
import org.springframework.http.HttpStatus;
import org.springframework.http.ResponseEntity;
import org.springframework.web.bind.annotation.GetMapping;
import org.springframework.web.bind.annotation.PathVariable;
import org.springframework.web.bind.annotation.RestController;

import java.util.List;

@RestController
public class CommentApiController {
    @Autowired
    private CommentService commentService;
    // 1. 댓글 조회
    @GetMapping("/api/articles/{articleId}/comments")
    public ResponseEntity<List<CommentDto>> comments(@PathVariable Long articleId) {
        // 서비스에 위임
        List<CommentDto> dtos = commentService.comments(articleId);
        // 결과 응답
        return ResponseEntity.status(HttpStatus.OK).body(dtos);
    }
    // 2. 댓글 생성
    // 3. 댓글 수정
    // 4. 댓글 삭제
}
package com.example.firstproject.service;
import com.example.firstproject.dto.CommentDto;
import com.example.firstproject.entity.Comment;
import com.example.firstproject.repository.ArticleRepository;
import com.example.firstproject.repository.CommentRepository;
import org.springframework.beans.factory.annotation.Autowired;
import org.springframework.stereotype.Service;
import java.util.ArrayList;
import java.util.List;
import java.util.stream.Collectors;
@Service
public class CommentService {
@Autowired
private CommentRepository commentRepository;
@Autowired
private ArticleRepository articleRepository;
public List<CommentDto> comments(Long articleId) {
/*
// 1. 댓글 조회
List<Comment> comments = commentRepository.findByArticleId(articleId);
// 2. 엔티티 -> DTO 변환
List<CommentDto> dtos = new ArrayList<>();
for (int i = 0; i < comments.size(); i++) {
Comment c = comments.get(i);
CommentDto dto = CommentDto.createCommentDto(c);
dtos.add(dto);
}
// 3. 결과 반환
return dtos;
*/
/*
return commentRepository.findByArticleId(articleId) // 댓글 엔티티 목록 조회
.stream() // 댓글 엔티티 목록을 스트림으로 변환
.map(comment -> CommentDto.createCommentDto(comment)) // 엔티티를 DTO로 매핑
.collect(Collectors.toList()); // 스트림을 리스트로 변환
*/
return commentRepository.findByArticleId(articleId) // 댓글 엔티티 목록 조회
.stream() // 댓글 엔티티 목록을 스트림으로 변환
.map(CommentDto::createCommentDto) // 엔티티를 DTO로 매핑
.collect(Collectors.toList()); // 스트림을 리스트로 변환
}
}package com.example.firstproject.dto;
import com.example.firstproject.entity.Comment;
import lombok.AllArgsConstructor;
import lombok.Getter;
import lombok.NoArgsConstructor;
import lombok.ToString;
@AllArgsConstructor
@NoArgsConstructor
@Getter
@ToString
public class CommentDto {
private Long id;
private Long articleId;
private String nickname;
private String body;
public static CommentDto createCommentDto(Comment comment) {
return new CommentDto(
comment.getId(), // 댓글 엔티티의 id
comment.getArticle().getId(), // 댓글 엔티티가 속한 부모 게시글의 id
comment.getNickname(), // 댓글 엔티티의 nickname
comment.getBody() // 댓글 엔티티의 body
);
}
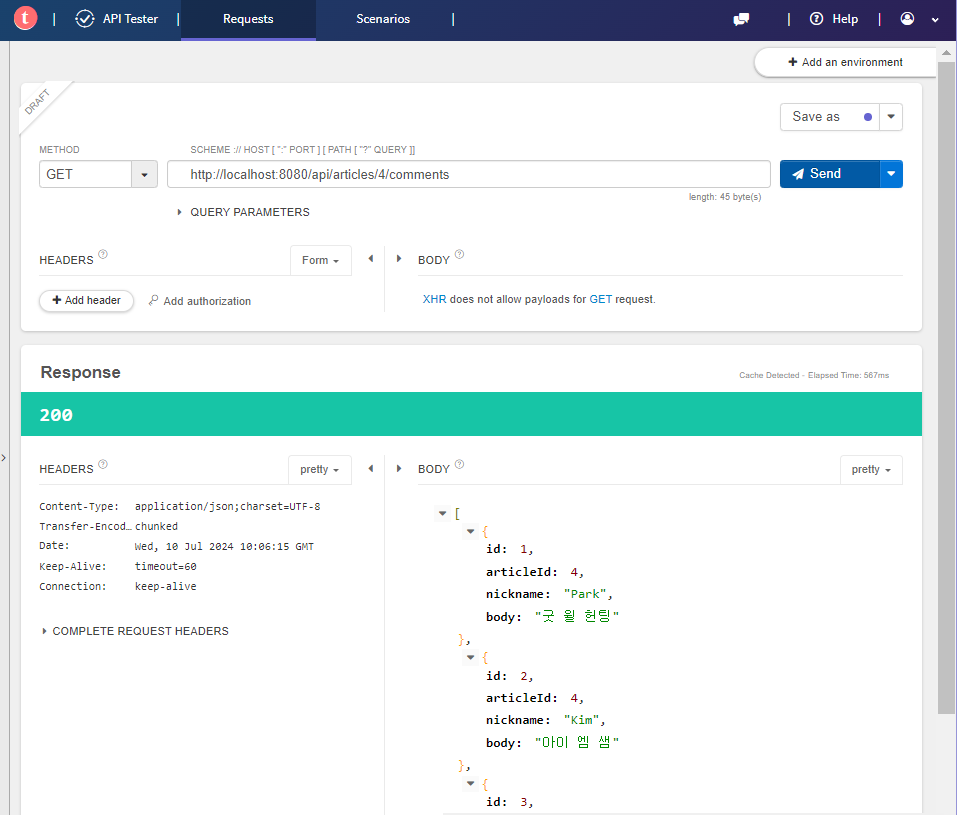
}
🚀 1분 퀴즈
- ( 엔티티 ) : 리포지토리가 DB 속 데이터를 조회하거나 전달할 때 사용하는 객체
- ( DTO ) : 단순 데이터 전송만을 목적으로 하는 객체, 클라이언트와 서버 사이에서 사용됨
- ( 서비스 ) : 컨트롤러와 리포지토리의 사이에서 비즈니스 로직, 즉 처리 흐름을 담당하는 객체
- ( REST 컨트롤러 ) : 클라이언트의 요청을 받고 응답하는 객체로, 뷰(view)가 아닌 데이터를 반환
15.4 댓글 생성하기
컨트롤러
// 2. 댓글 생성
@PostMapping("/api/articles/{articleId}/comments")
public ResponseEntity<CommentDto> create(@PathVariable Long articleId,
                                         @RequestBody CommentDto dto) {
    // 서비스에 위임
    CommentDto createdDto = commentService.create(articleId, dto);
    // 결과 응답
    return ResponseEntity.status(HttpStatus.OK).body(createdDto);
}
서비스
  @Transactional
  public CommentDto create(Long articleId, CommentDto dto) {
      // 1. 게시글 조회 및 예외 발생
      Article article = articleRepository.findById(articleId)
              .orElseThrow(() -> new IllegalArgumentException("댓글 생성 실패! " +
                      "대상 게시글이 없습니다."));
      // 2. 댓글 엔티티 생성
      Comment comment = Comment.createComment(dto, article);
      // 3. 댓글 엔티티를 DB에 저장
      Comment created = commentRepository.save(comment);
      // 4. DTO로 변환해 반환
      return CommentDto.createCommentDto(created);
}
엔티티
public static Comment createComment(CommentDto dto, Article article) {
    // 예외 발생
    if (dto.getId() != null)
        throw new IllegalArgumentException("댓글 생성 실패! 댓글의 id가 없어야 합니다.");
    if (dto.getArticleId() != article.getId())
        throw new IllegalArgumentException("댓글 생성 실패! 게스글의 id가 잘못됐습니다.");
    // 엔티티 생성 및 반환
    return new Comment(
            dto.getId(),
            article,
            dto.getNickname(),
            dto.getBody()
    );
}
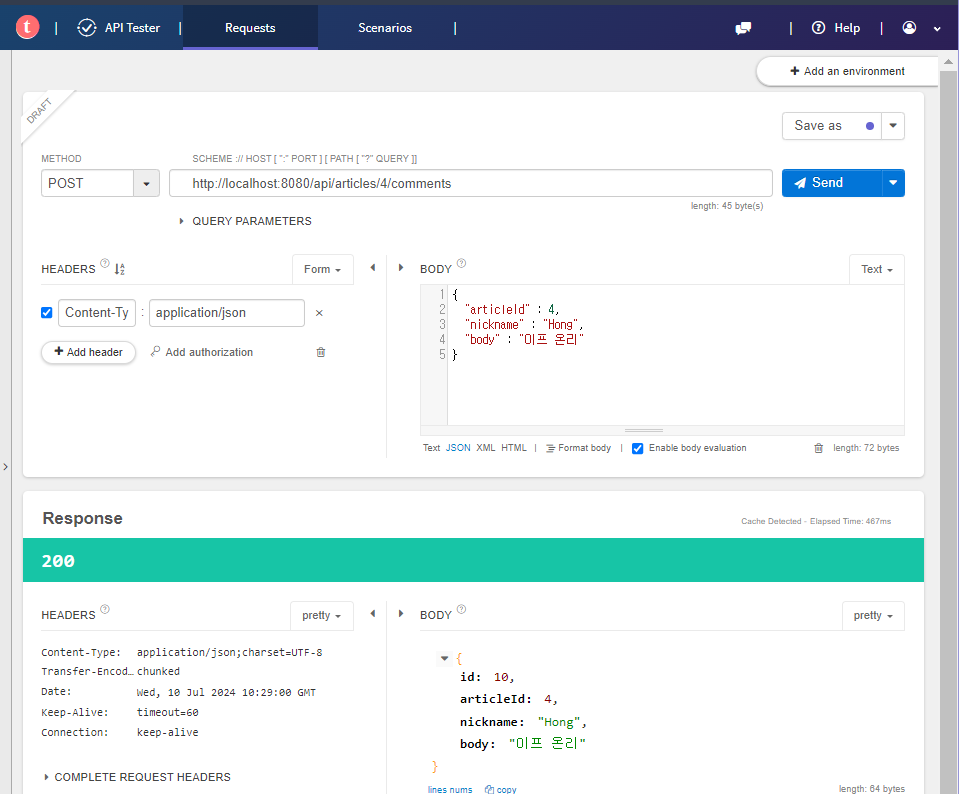
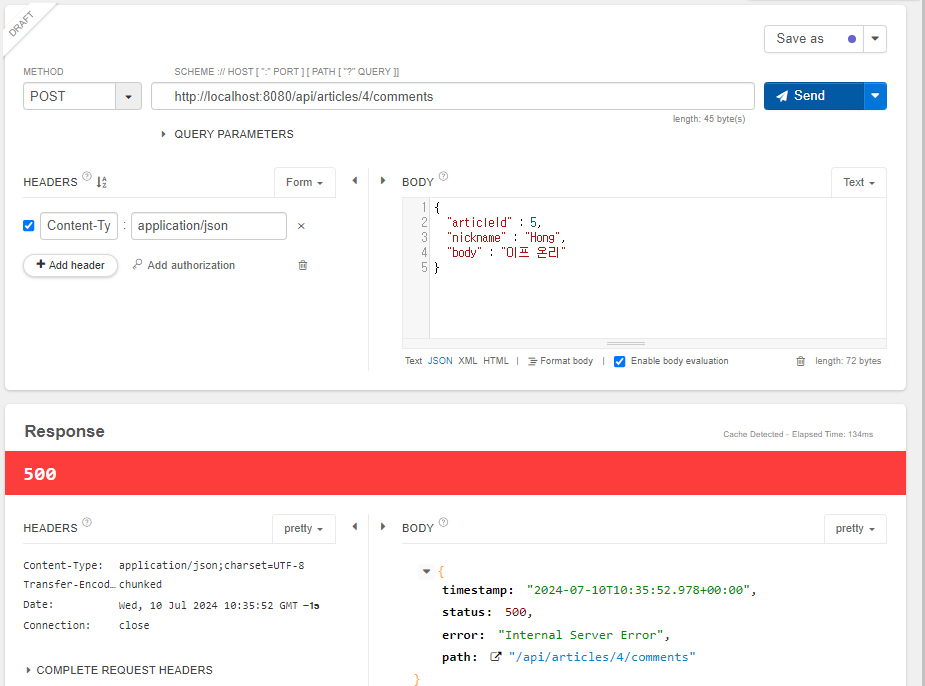
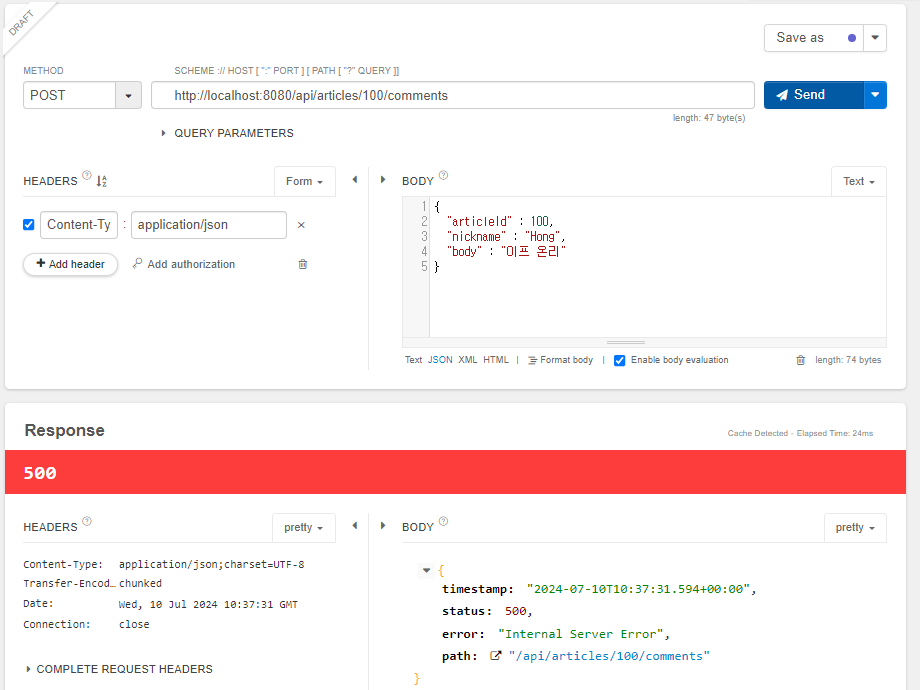
💡 JSON 데이터의 키(key) 이름과 DTO 필드 명이 다른 경우 필드 위에 `@JsonProperty(”키_이름”)`을 붙여야 함
🚀 1분 퀴즈

- 댓글 작성을 위한 REST API 요청 중 옳지 않은 설명은?
- HTTP를 통해 POST 요청을 보내고 있다.
- 댓글의 정보를 JSON 형식으로 전송하고 있다.
- 댓글의 정보를 컨트롤러에서 @RequestBody로 받을 수 있다.
- 해당 요청을 통해 5번 게시글에 댓글이 작성된다.
⇒ 4) URL은 4번 게시글에 요청하고 있으므로 오류가 발생한다.
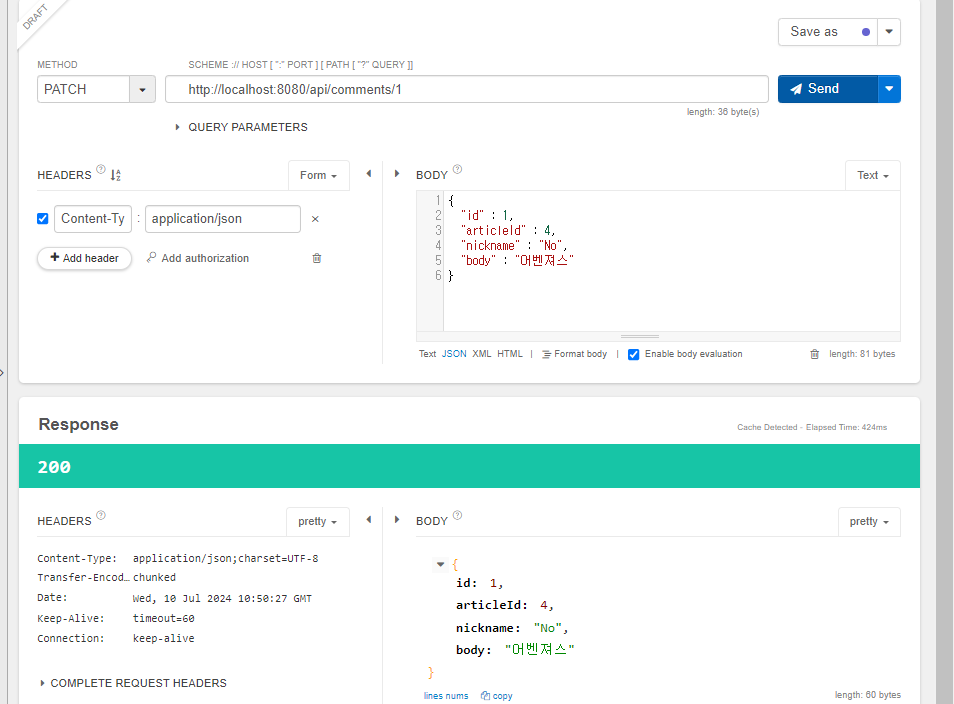
15.5 댓글 수정하기
컨트롤러
// 3. 댓글 수정
@PatchMapping("/api/comments/{id}")
public ResponseEntity<CommentDto> update(@PathVariable Long id,
                                         @RequestBody CommentDto dto) {
    // 서비스에 위임
    CommentDto updatedDto = commentService.update(id, dto);
    // 결과 응답
    return ResponseEntity.status(HttpStatus.OK).body(updatedDto);
}
서비스
@Transactional
public CommentDto update(Long id, CommentDto dto) {
    // 1. 댓글 조회 및 예외 발생
     Comment target = commentRepository.findById(id)
             .orElseThrow(() -> new IllegalArgumentException("댓글 수정 실패! " +
                     "대상 댓글이 없습니다."));
    // 2. 댓글 수정
    target.patch(dto);
    // 3. DB로 갱신
    Comment updated = commentRepository.save(target);
    // 4. 댓글 엔티티를 DTO로 변환 및 반환
    return CommentDto.createCommentDto(updated);
}
엔티티
public void patch(CommentDto dto) {
    // 예외 발생
    if(this.id != dto.getId())
        throw new IllegalArgumentException("댓글 수정 실패! 잘못된 id가 입력됐습니다.");
    // 객체 갱신
    if(dto.getNickname() != null)
        this.nickname = dto.getNickname();
    if(dto.getBody() != null)
        this.body = dto.getBody();
}


🚀 1분 퀴즈
- HTTP 요청 중 수정을 위한 메서드에는 PUT과 ( PATCH )(이)가 있다.
- 입력값이 잘못된 경우에 ( IllegalArgumentException )클래스를 사용해 예외 처리를 한다.
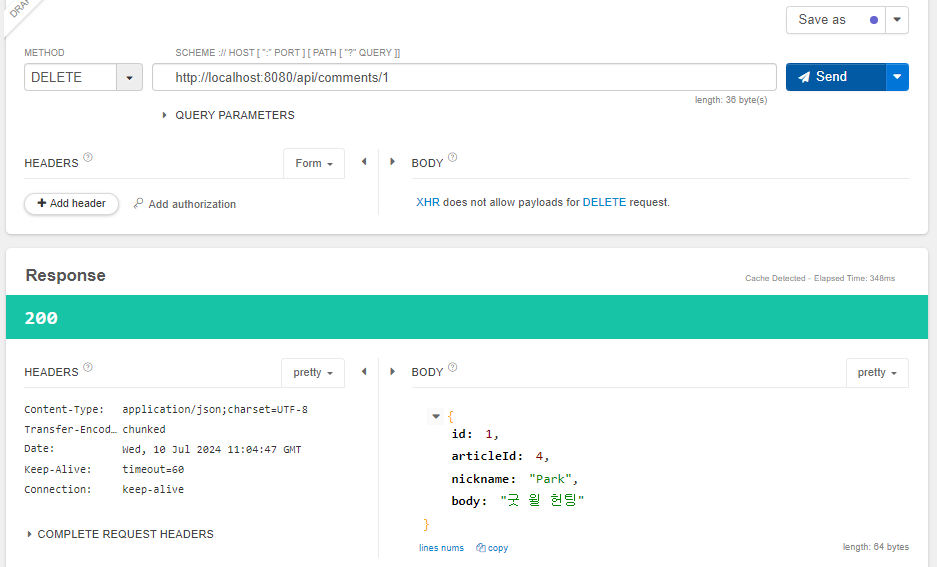
15.6 댓글 삭제하기
컨트롤러
// 4. 댓글 삭제
@DeleteMapping("/api/comments/{id}")
public ResponseEntity<CommentDto> delete(@PathVariable Long id) {
    // 서비스에 위임
    CommentDto deletedDto = commentService.delete(id);
    // 결과 응답
    return ResponseEntity.status(HttpStatus.OK).body(deletedDto);

}
서비스
@Transactional
public CommentDto delete(Long id) {
    // 1. 댓글 조회 및 예외 발생
    Comment target = commentRepository.findById(id)
            .orElseThrow(()->new IllegalArgumentException("댓글 삭제 실패! " +
                    "대상이 없습니다."));
    // 2. 댓글 삭제
    commentRepository.delete(target);
    // 3. 삭제 댓글을 DTO로 변환 및 반환
    return CommentDto.createCommentDto(target);
}

🚀 1분 퀴즈
- ( @DeleteMapping ) 애노테이션은 HTTP 삭제 요청을 받아 특정 컨트롤러 메서드를 수행한다.
- ( @PathVariable ) 애노테이션은 HTTP 요청 주소에서 특정 값을 매개변수로 가져온다.
- ( @Transactional ) 애노테이션은 예외 발생 시 변경된 데이터를 변경 전으로 롤백한다.
✅ 셀프 체크
- 다음 피자 데이터를 CRUD하기 위한 REST API 주소 설계
| id | name | price |
| 1 | 페퍼로니 피자 | 25,900 |
| 2 | 불고기 피자 | 29.900 |
| 3 | 고구마 피자 | 30,900 |
| 4 | 포테이토 피자 | 27,900 |
| 5 | 치즈 피자 | 23,900 |
1. 엔티티 : 클래스 이름은 Pizza로 합니다.
@Entity
@AllArgsConstructor
@NoArgsConstructor
@Getter
@ToString
public class Pizza {
	@Id
  @GeneratedValue(strategy = GenerationType.IDENTITY)
	private Long id;
	@Column
	private String name;
	@Column
	private int price;
}
2. REST API 주소 : 피자 데이터의 생성, 조회(단건 조회, 목록 조회), 수정, 삭제 요청에 대한 주소를 설계합니다.
- 생성 : POST - “/api/pizzas
- 단건 조회 : GET - “/api/pizzas/{id}
- 목록 조회 : GET - “/api/pizzas”
- 수정 : PATCH - “/api/pizzas/{id}”
- 삭제 : DELETE - “/ap/pizzas/{id}”
🏓 더 알아볼 내용
1. @Builder
혹시 빌더 패턴에 대해 들어봤나요? 빌더 패턴은 체이닝을 통해 생성자에 들어갈 매개변수를 하나하나 받아 객체를 빌드하는 패턴입니다. 그리고 이를 롬복에서는 @Builder 애노테이션으로 아주 쉽게 구현해 놓았습니다.
다음 코드는 롬복 홈페이지에 있는 Builder 소개에서 가져온 코드입니다. 바닐라 자바로
Builder를 작성한 것입니다.
import java.util.Set;

public class BuilderExample {

        private long created;
        private String name;
        private int age;
        private Set<String> occupations;

        BuilderExample(String name, int age, Set<String> occupations) {
                [this.name](http://this.name/) = name;
                this.age = age;
                this.occupations = occupations;
        }

        private static long $default$created() {
                return System.currentTimeMillis();
        }

        public static BuilderExampleBuilder builder() {
                return new BuilderExampleBuilder();
        }

        public static class BuilderExampleBuilder {

                private long created;
                private boolean created$set;
                private String name;
                private int age;
                private java.util.ArrayList<String> occupations;

                BuilderExampleBuilder() {
                }

                public BuilderExampleBuilder created(long created) {
                        this.created = created;
                        this.created$set = true;
                        return this;
                }

                public BuilderExampleBuilder name(String name) {
                        [this.name](http://this.name/) = name;
                        return this;
                }

                public BuilderExampleBuilder age(int age) {
                        this.age = age;
                        return this;
                }

                public BuilderExampleBuilder occupation(String occupation) {
                        if (this.occupations == null) {
                        this.occupations = new java.util.ArrayList<String>();
                }

                this.occupations.add(occupation);
                        return this;
                }

                public BuilderExampleBuilder occupations(Collection<? extends String> occupations) {
                        if (this.occupations == null) {
                                this.occupations = new java.util.ArrayList<String>();
                        }
                        this.occupations.addAll(occupations);
                        return this;
                }

                public BuilderExampleBuilder clearOccupations() {
                        if (this.occupations != null) {
                                this.occupations.clear();
                        }
                        return this;
                }

                public BuilderExample build() {
                        // complicated switch statement to produce a compact properly sized immutable set omitted.
                        Set<String> occupations = ...;
                        return new BuilderExample(created$set ? created :
                                BuilderExample.$default$created(), name, age, occupations);
                }

                @java.lang.Override
                public String toString() {
                        return "BuilderExample.BuilderExampleBuilder(created = " + this.created + ", name = " + [this.name](http://this.name/) + ", age = " + this.age + ", occupations = " + this.occupations + ")";
                }
        }
}
그럼 우리는 이 코드를 얼마나 간단하게 사용할 수 있을까요? @Builder를 사용하면 이렇게 간단해집니다.
import lombok.Builder;
import lombok.Singular;
import java.util.Set;
@Builder
public class BuilderExample {
@Builder.Default private long created = System.currentTimeMillis();
private String name;
private int age;
@Singular private Set<String> occupations;
}
이제 @Builder의 사용 예시를 보겠습니다.
@AllArgsConstructor
@NoArgsConstructor
@Getter
@Builder
@Entity
public class Book {
@Id
@GeneratedValue
private Long id;
private String name;
private String author;
private Instant publishedAt;
private Long version;
}
이런 코드가 있을 경우 @Builder를 사용하면 간단하게 Book 인스턴스를 생성할 수있습니다.
class BookTest {
        @Test
        void generate() {
                Book build = Book.builder()
                        .name("test title")
                        .author("test author")
                        .publishedAt(Instant.now())
                        .build();
                assertThat(build.getName()).isEqualTo("test title");
                assertThat(build.getAuthor()).isEqualTo("test author");
        }
}
1. @Builder의 장점
- 필요한 데이터만 설정해 인스턴스를 생성할 수 있습니다.
- 생성자를 사용하는 것보다 가독성이 높습니다.
- 유연한 구조를 가집니다.
2. 자바 8 Stream & map
스트림(Stream)은 자바 8 버전에서 새롭게 소개된 기능 중 하나로, 컬렉션을 처리하는 데매우 유용한 클래스입니다. 스트림에는 3가지 기본 개념이 존재합니다.
- 데이터의 연속적인 흐름을 나타냅니다.
- 스트림에 대한 변환 작업을 수행하는 메서드를 제공합니다. 대표적으로 map(), filter(), reduce() 등이 있습니다.
- 스트림의 최종 결과를 생성하거나 외부 데이터 소스에 결과를 도출하는 메서드를 제공합니다.
다음 코드를 살펴보겠습니다. 스트림은 컬렉션을 처리하는 데 강력한 무기라는 걸 알 수있습니다.
@Test
void test() {
        Book book1 = Book.builder()
                .name("test title1")
                .author("test author1")
                .publishedAt(Instant.now())
                .build();
        Book book2 = Book.builder()
                .name("test title2")
                .author("test author2")
                .publishedAt(Instant.now())
                .build();
        Book book3 = Book.builder()
                .name("test title3")
                .author("test author3")
                .publishedAt(Instant.now())
                .build();

        List<Book> books = List.of(book1,book2,book3);

        List<String> list = books.stream() // .. list에서 stream 생성
                .map(Book::getName()) // map 메서드를 통해서 이름만을 가져온 stream으로 전환
                .filter(name -> name.contains("1")) // filter를 통해서 1이 포함된 값만 추출
                .toList(); // list로 변환

        assertThat(list.size()).isEqualTo(1);
}
1. stream의 특징
- 스트림은 선언적인 방식으로 데이터를 처리합니다. 어떤 작업을 어떻게 하는지에 대한 세부 사항을 숨길 수 있습니다.
- 스트림은 내부적으로 요소를 병렬로 처리할 수 있도록 지원하므로 멀티코어 아키텍처에서 성능을 향상시킬 수 있습니다.
- 스트림은 일회용이 아니며, 필요한 경우 여러 번 사용할 수 있습니다.
2. map() 메서드
다음은 스트림의 map() 메서드 코드입니다.
/**
    * Returns a stream consisting of the results of applying the given
    * function to the elements of this stream.
    *
    * <p>This is an <a href="package-summary.html#StreamOps">intermediate
    * operation</a>.
    *
    * @param <R> The element type of the new stream
    * @param mapper a <a href="package-summary.html#NonInterference">non-interfering</a>,
    * <a href="package-summary.html#Statelessness">stateless</a>
    * function to apply to each element
    * @return the new stream
*/
<R> Stream<R> map(Function<? super T, ? extends R> mapper);
map() 메서드의 특징은 다음과 같습니다.
- map() 메서드를 사용하면 각 요소에 지정된 함수를 적용해 새로운 값을 생성할 수있습니다.
(예: .map(book → book.getName()) - 원본 스트림을 변경하지 않고, 새로운 스트림을 반환합니다.
(예: .map(book → book.getName()의 경우 getter로 반환된 값만을 포함한 스트림이 생성됨) - map() 메서드 역시 다른 함수형 메서드처럼 체인화가 가능합니다.
(예: .map(book → book.getName()).map(name → name.split(“ ”) …)
map() 메서드는 매개변수로 Function을 받습니다. Function 역시 자바 8에서 추가된 개념인데요. map() 메서드를 사용하기 위해서 추가로 학습하는 것을 추천합니다.
'FrameWork > Spring' 카테고리의 다른 글
| 17장 : 웹 페이지에서 댓글 등록하기 (0) | 2024.07.30 |
|---|---|
| 16장 : 웹 페이지에서 댓글 목록 보기 (0) | 2024.07.29 |
| 14장 : 댓글 엔티티와 리포지토리 만들기 (0) | 2024.07.10 |
| 13장 : 테스트 코드 작성하기 (0) | 2024.07.09 |
| 12장 : 서비스 계층과 트랜잭션 (0) | 2024.07.09 |


