
기록방
17장 : 웹 페이지에서 댓글 등록하기 본문
길벗 IT도서에서 주관하는 코딩 자율학습단 8기 : Spring Boot 파트에 참여한 기록입니다 [ 목록 ]
17.1 댓글 등록의 개요
새 댓글 등록을 위한 뷰 페이지를 만들고 JS 코드로 REST API를 호출해 보자
- 댓글 생성 뷰 페이지(new에 댓글 입력 폼 만들기
- [댓글 작성] 버튼을 클릭해 REST API 요청 보내기
그동안 REST API 요청에 Talend API Tester를 이용했는데, 실제로는 해당 웹페이지에서 요청을 보냄
- document.querySelector() : 웹 페이지에서 특정 요소(버튼)를 찾아 반환
- addEventListener() : 특정 요소에 이벤트가 발생(버튼 클릭)했을 때 특정 동작(댓글 객체 전달)을 수행
- fetch() : 웹 페이지에서 REST API 요청(POST 요청)을 보냄
17.2 댓글 생성 뷰 페이지 만들기
<div class="card m-2" id="comments-new">
    <div class="card-body">
        <!--댓글 작성 폼-->
        <form class="container" action="/articles/create" method="post">
            <div class="mb-3">
                <label class="form-label">닉네임</label>
                <input type="text" class="form-control" id="new-comment-nickname">
            </div>
            <div class="mb-3">
                <label class="form-label">댓글 내용</label>
                <textarea type="text" class="form-l" rows="3" id="new-comment-body"></textarea>
            </div>
            <!--히든 인풋-->
            {{#article}}
                <input type="hidden" id="new-comment-article-id" value="{{id}}">
            {{/article}}
            <!--전송 버튼-->
            <button type="submit" class="btn btn-primary">Submit</button>
        </form>
    </div>
</div>- comments_new.mustache

17.3 자바스크립트로 댓글 달기
17.3.1 버튼 클릭 이벤트 감지하기
<script>
    {
        // 댓글 생성 버튼 변수화
        const commentCreateBtn = document.querySelector("#comment-create-btn")
        // 댓글 클릭 이벤트 감지
        commentCreateBtn.addEventListener("click", function () {
            console.log("버튼을 클릭했습니다.");
        })
    }
</script>
17.3.2 새 댓글 자바스크립트 객체 생성하기
<script>
{
// 댓글 생성 버튼 변수화
const commentCreateBtn = document.querySelector("#comment-create-btn")
// 댓글 클릭 이벤트 감지
commentCreateBtn.addEventListener("click", function () {
// 새 댓글 객체 생성
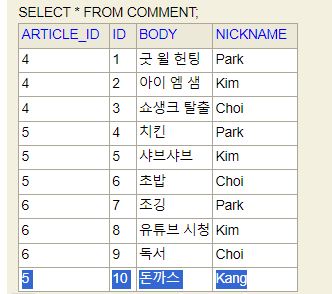
const comment = {
// 새 댓글의 닉네임
nickname: document.querySelector("#new-comment-nickname").value,
// 새 댓글의 본문
body: document.querySelector("#new-comment-body").value,
// 부모 게시글의 id
articleId: document.querySelector("#new-comment-article-id").value
}
// 댓글 객체 출력
console.log(comment);
})
}
</script>
17.3.3 자바스크립트로 REST API 호출하고 응답 처리하기
<script>
    {
        // 댓글 생성 버튼 변수화
        const commentCreateBtn = document.querySelector("#comment-create-btn")
        // 댓글 클릭 이벤트 감지
        commentCreateBtn.addEventListener("click", function () {
            // 새 댓글 객체 생성
            const comment = {
                // 새 댓글의 닉네임
                nickname: document.querySelector("#new-comment-nickname").value,
                // 새 댓글의 본문
                body: document.querySelector("#new-comment-body").value,
                // 부모 게시글의 id
                articleId: document.querySelector("#new-comment-article-id").value
            }
            // 댓글 객체 출력
            console.log(comment);
            // fetch() - 비동기 통신을 위한 API
            const url = "/api/articles/" + comment.articleId + "/comments";
            fetch(url, {
                method: "POST",               // POST 요청
                headers: {                    // 전송 본문의 데이터 타입(JSON) 정보
                    "Content-Type" : "application/json"
                },
                body: JSON.stringify(comment) // comment 객체를 JSON 문자열로 변환해 전송
            }).then(response => {
                // HTTP 응답 코드에 따른 메시지 출력
                const msg = (response.ok) ? "댓글이 등록됐습니다." : "댓글 등록 실패..!";
                alert(msg);
                // 현재 페이지 새로 고침
                window.location.reload();
            })
        })
    }
</script>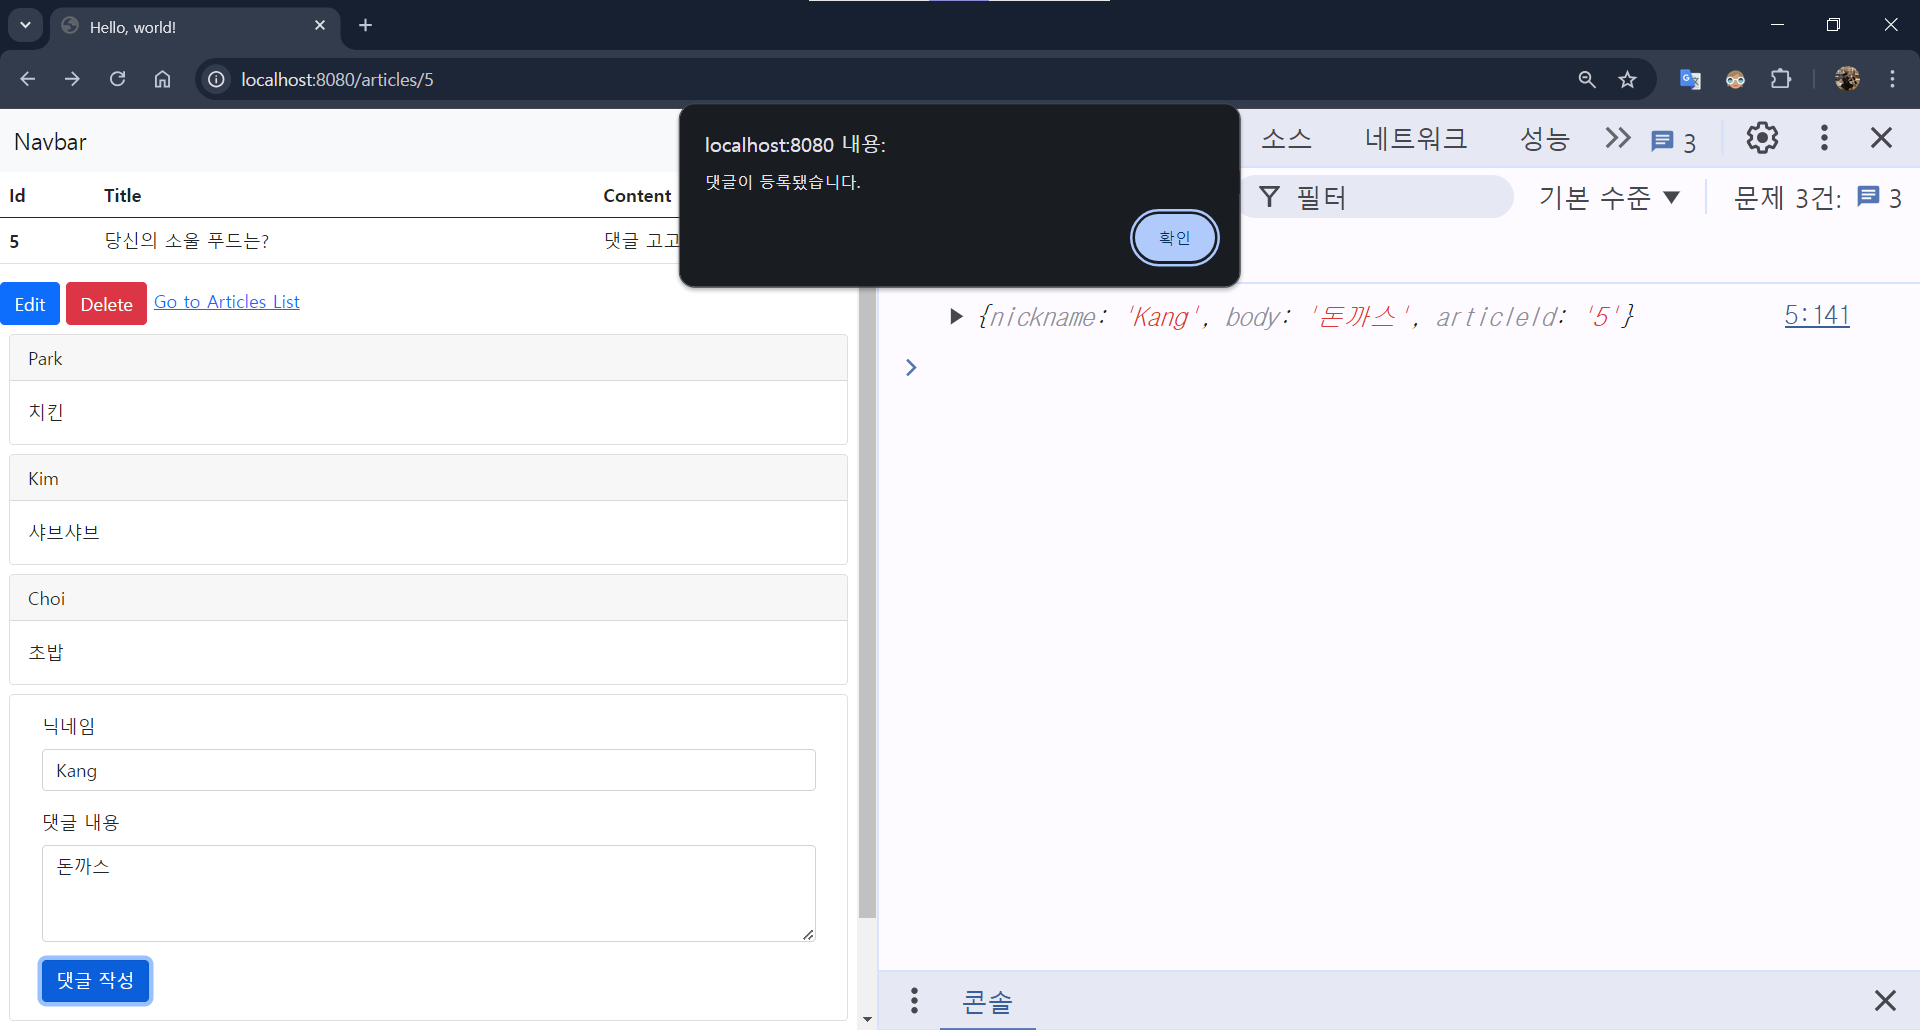

🚀 1분 퀴즈
다음 자바스크립트에 관한 설명 중 잘못된 것을 고르세요.
- alert()는 입력 문자열을 브라우저 콘솔에 출력한다.
- fetch()는 API 요청을 보내고 응답을 받아 처리할 수 있게 한다.
- JSON.stringify()는 객체를 입력받아 JSON 문자열로 반환한다.
- addEventListener()는 특정 요소가 이벤트를 감지해 처리하게 한다.
- document.querySelector()는 웹 페이지에서 특정 요소를 찾아 반환한다.
⇒ 1. 콘솔이 아니라 팝업창에 출력한다.
✅ 셀프 체크
- 다음 웹 페이지에 스프링 부트를 입력하고 [전송] 버튼을 클릭하면
Hello. World!가Hello, 스프링 부트!로 변경되도록 하려고 합니다. - 이를 위한 자바스크립트 코드를 완성하세요(단, 특정 요소의 텍스트를 변경할 때는 innerText 속성을 사용합니다(예: someElement.innerText = “헬로”;))
<html>
<head>
    <title>셀프체크 17</title>
</head>
<body>
    <h1>Hello, <span id="target">World</span>!</h1>
    <input type="Text" id="text-input">
    <button id="send-btn">전송</button>
    <script>
        const btn = document.querySelector("#send-btn");
        btn.addEventLitener("click", function() {
            const target = document.querySelector("#target");
            const text = document.querySelector("#text-input");
            target.innerText = text.value;
            text.innerText = "";
        });
</script>
</body>
</html>
🏓 더 알아볼 내용
1. 객체를 주입하는 다양한 방법
먼저 책에서 사용하는 @Autowired를 사용하는 방법입니다. @Autowired를 사용하면 자동으로 컨테이너에서 객체를 끌어와 주입해 줍니다.
@RequestMapping("/")
@RestController
public class DemoController {
        @Autowired
        private DemoService demoService;
        @GetMapping
        public String get() {
                String s = demoService.getDemo();
                return s;
        }
}
두 번째 방법은 생성자를 사용하는 방법입니다.
@RequestMapping("/")
@RestController
public class DemoController {
        private final DemoService demoService;

        @Autowired
        public DemoController(DemoService demoService) {
                this.demoService = demoService;
        }

        @GetMapping
        public String get() {
                String s = demoService.getDemo();
                return s;
        }
}
여기서도 @Autowired가 들어가는데요. 이때 생성자가 한 개이면 Autowired를 생략할 수 있습니다.
@RequestMapping("/")
@RestController
public class DemoController {
        private final DemoService demoService;
        public DemoController(DemoService demoService) {
                this.demoService = demoService;
        }
        @GetMapping
        public String get() {
        String s = demoService.getDemo();
                return s;
        }
}
2. @RequiredArgsConstructor
@RequiredArgsConstructor는 롬복에서 제공해주는 애노테이션 입니다. 다음 설명에서도 알수 있듯이 final 필드 혹은 @NonNull 애노테이션이 붙어 있는 필드에 한해서 생성자를 생성해 줍니다. 참고로 final 필드는 ‘최종’이라는 단어의 뜻에서도 알 수 있듯이 초깃값이 한번 저장되면 이것이 최종 값이 되어 프로그램 실행 도중 수정할 수 없는 필드를 말합니다.
Generates a constructor with required arguments. Required arguments are final fields and fields with constraints such as @NonNull. Complete documentation is found at the project lombok features page for @Constructor . Even though it is not listed, this annotation also has the onConstructor parameter. See the full documentation for more details.
@RequiredArgsContructor 애노테이션과 컨트롤러를 조합하면 어떨까요? 아래처럼 코드가 훨씬 간단해집니다! 비단 컨트롤러 뿐만 아니라 다른 컴포넌트에서도 활용 가능하니 참고해 주세요!
@RequestMapping("/")
@RestController
@RequiredArgsConstructor
public class DemoController {
        private final DemoService demoService;
        @GetMapping
        public String get() {
                String s = demoService.getDemo();
                return s;
        }
}'FrameWork > Spring' 카테고리의 다른 글
| 19장 : 웹 페이지에서 댓글 삭제하기 (0) | 2024.08.06 |
|---|---|
| 18장 : 웹 페이지에서 댓글 수정하기 (0) | 2024.07.30 |
| 16장 : 웹 페이지에서 댓글 목록 보기 (0) | 2024.07.29 |
| 15장 : 댓글 컨트롤러와 서비스 만들기 (0) | 2024.07.10 |
| 14장 : 댓글 엔티티와 리포지토리 만들기 (0) | 2024.07.10 |


